Introduction - Arduino-Mega platform
In this page we explain:
- how to install Terra development environment,
- how to compile the firmware of the Arduino Mega version of TerraVM and flash it into a device,
- how to compile your Terra Script,
- how to load a Terra Script bytecode in the network, and
- how connect the NRF24 radio board to Mega board.
The main Arduino customization is based on Terra NET flavor for the Mega2560 platform using the NRF24L01+ radio board. Currently we tested Terra in two boards:
- Original Arduino Mega 2560.
- An alternative Atmega2560 board from INHAOS
You will find in this page detailed information about TerraIno specific events and functions.
Installing Terra Ino in a Linux Box
Pre-requisites
- Linux machine. This procedure was tested with Ubuntu 16.04.
- Internet access.
Installation Steps
Install, if necessary, the following packages.
Open a command terminal and execute the following commands.
sudo apt-get update
sudo apt-get install git lua5.1 lua-lpeg nescc gcc-avr avr-libc avrdude
Adjust USB access permission for your user:
sudo usermod -a -G dialout $USERNote: You must logout and login again to validate this new permission.
Get Terra source code from the repository
Clone Terra repository into home directory.
Open a command terminal, change to home directory, and download Terra repository.
cd ~
git clone https://github.com/afbranco/Terra
The next time use the command git pull from the new Terra dir to get last update
Create environment definitions
Open a command terminal and change to HOME directory
cd ~Open the file .bashrc in the editor.
gedit .bashrcInsert following lines at the end of the file.
# Export Terra paths
export TERRADIR=$HOME/Terra
export CLASSPATH=$TERRADIR/TerraControl/tinyos.jar:.$CLASSPATH

# Tools alias
alias terrac='$TERRADIR/terrac/terrac -I$TERRADIR/TerraVM/src/TerraDefs'
alias ttool='java -jar $TERRADIR/TerraControl/TControl.jar'
alias sf='java net.tinyos.sf.SerialForwarder'
Open a new command terminal to get the new environment.
Compiling and flashing
After a successful installation, you can generate a compiled file and flash it into an Arduino Mega board.
Terra development environment uses a Make system to build and install the firmware.
You must change to the $HOME/Terra/TerraVM/src directory and execute make mega
command with additional parameters.
The follow command is an example of Terra compilation for Arduino Mega board:
make mega TYPE:BOTH VM:NET MOD:MSGQ USB:/dev/ttyACM0 BS_BAUD:19200 install.4Attention points
We must pay attention for some details when compiling and installing Terra for Arduino Mega.
The TYPE:type parameter indicates if your node will communicate via USB interface (BOTH) or not (NOBS). Usually one node, acting as BaseStation or sink node, is connected to a computer via USB interface when the all nodes communicate via radio. Hybrid networks may create a bridge connecting two node with different radios via serial/USB interface.
The BS_BAUD:value configures the USB baud rate for Terra operation. (This does not change the firmware flashing baud rate that is configured internally in the system.)
The INSTAL.n parameter indicates to flash the compiled file. The n is the unique node identifier for its network.
The real node address is the combination of the Network ID and the unique node identifier.
For example, the default Network Id for the NRF24 network is the number 3.
The node address, considering the unique ID 1, will be (3*2048)+1 = 6145.
The USB:path identifies the USB connected to flash the Mega Board.
This value is usually /dev/ttyACM0 or /dev/ttyUSB0,
this depends on the FDDI chip used in the board.
But its number may change if the previous connection is already allocated.
Use the command ls /dev/ttyA* or ls /dev/ttyU* to find the correct port.
The INO_RADIO:radio defines the radio board used in the node. Only the NRF24 value was fully tested in the last Terra version. Use the option NO_RADIO in the case you are not using a radio board, i.e. your Arduino Mega communicates only by the USB interface.
The INO_TOOLS_PATH: defines which avr-gcc installation will be used. In general you don't need to use this option, the default value points to the GNU/AVR installation. If you desires or needs to use the Arduino installation compiler, you have two options:
- Using the option INO_TOOLS_PATH:A, the system will try to locate in the local disk an Arduino installation to be used.
- You may use INO_TOOLS_PATH:path, where path is the place of the Arduino installation tools directory.
For example:
$HOME/arduino-1.0.5/hardware/tools
Terra compilation parameters
These are the allowed parameters when compiling for Arduino Mega board.
The command make help mega will show an updated definition.
- MOD: Define additional modules: MSGQ | default ''
- QUEUE: Generate short or long queues | default SHORT
- TYPE: Configure runtime type: NOBS or BOTH | default BOTH
- MOTE_TYPE: Define mote type: 1..254 | Default 1
- VERB: Verbose Compilation mode: Y or N | Default N
- RFPOWER: RF Power: 0 1 2 3 4 5 6 7 | default 7
- INO_RADIO: Radio board for mega: NRF24 or NO_RADIO| default NO_RADIO
- IFLASH: Internal Flash for prog storage: Y or N | default Y
- NET_ID: Network identifier - 0..30 | default 0:cc1000, 1:cc2420, 2:wifi-udp, 3:esp, 4:nrf24, 5:xbee
- install.
- Install command + unique node identifier inside its network - 1..2047 | default 1 - USB: USB dev path. | default /dev/ttyACM0
- BS_BAUD: BaseStation baud rate - 115200, 57600, 19200 | default 115200
- ANA0_REF: Reference voltage for Analog 0 read - DEFAULT,INTERNAL1V1,INTERNAL2V56,EXTERNAL | default INTERNAL1V1
- ANA1_REF: Reference voltage for Analog 1 read - DEFAULT,INTERNAL1V1,INTERNAL2V56,EXTERNAL | default INTERNAL1V1
- ANA2_REF: Reference voltage for Analog 2 read - DEFAULT,INTERNAL1V1,INTERNAL2V56,EXTERNAL | default INTERNAL1V1
- ANA3_REF: Reference voltage for Analog 3 read - DEFAULT,INTERNAL1V1,INTERNAL2V56,EXTERNAL | default INTERNAL1V1
- INO_TOOLS_PATH: Path to Arduino installation: A or path | Default ''
Compiling a Terra script
Terra scripts rely on a definition file targeting a specific customization.
In the case of Arduino, the TerraIno.defs file is the the basic customization.
This file must be referenced in the beginning of your script code as #include "TerraIno.defs".
Use the terrac command to compile your script.
Assuming that the name of your script file is myScript.terra, type the following command:
terrac myScript.terraThis command will generate a bytecode file named myScript.vmx
Loading a Terra Script into network
Considering that you already have a script compiled with terrac compiler,
you need to load the script bytecode into the Terra network nodes.
Two tools must be started to that: The TinyOS SerialForwarder application and the Terra Control tool.
The use of the Terra Control tool was explained in the Terra tutorial
at Terra Site.
The tool can be started by the ttool command.
After started, the tool waits for the SerialForwarder to connect to the USB.
The SerialForwarder is started by sf -comm serial@path:baud command,
where path is the path to the USB interface
and baud is the baud rate indicated in the BS_BAUD parameter.
sf -comm serial@/dev/ttyACM0:19200Connecting NRF24L01+ to Mega Board
The next figure shows the NRF24L01+ pin-out and the table shows the connections for Arduino Mega and MegaCore.
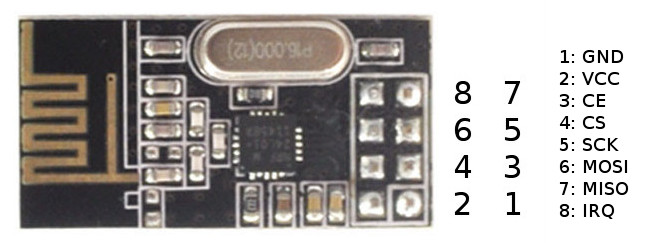
| NRF24 | Arduino Mega | MegaCore |
|---|---|---|
| 1 - GND | GND | GND |
| 2 - VCC 3.3v | 3.3v | 3.3v (external) |
| 3 - CE | Digital pin 11 | PB5 |
| 4 - CS | Digital pin 10 | PB4 |
| 5 - SCK | Digital pin 52 | PB1 |
| 6 - MOSI | Digital pin 51 | PB2 |
| 7 - MISO | Digital pin 50 | PB3 |
| 8 - IRQ | Digital pin 2 | PE4 |